Logo

Project: Fittonia Propagation

Posted by Jordan | Wednesday, November 26, 2008 | , , | 15 comments »

Propagating Fittonia 
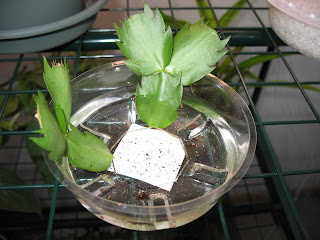
While I was at work on November 12th, I decided that it was time to try propagating my pink Fittonia (Fittonia argyroneura) because it was starting to get a little out of control, so I gathered up all of the tools I needed and started with the project.

The tools I used were:

After doing some research, I found that one of the easiest methods for fittonia propagation is by using stem cuttings. I used the bonsai trimming shears to cut the fittonia stems, selecting stems with 4 to 5 leaves. I put some houseplant soil into the two plastic cups I had, placed the cut stems about an inch down into the soil, and then packed the soil around the base of the stem. I then watered the cuttings, placed them into a plastic ziploc bag, and then sprayed them with water. The last step in the process was to blow air into the bag to expand it so that the plants had room to grow. Once the air was blown into the bags they were closed and the bags were placed on the top of a storage cabinet, which is about a foot below the fluorescent lighting fixture.

Propagating FittoniaEvery couple of days I spray more water, blow air into the bag, and reseal it. So far this has been working well and the cuttings appear to be growing.

There will be a status update in the future to check on the progress of the cuttings.

Schlumbergera truncataIf you have been reading this blog since last winter you will be happy to know that the Schlumbergera truncata (or Thanksgiving Cactus/Holiday Cactus) that I rooted and planted in a plastic cup -- (Read about it here and then in a subsequent post) -- is doing well and is currently flowering.


The Beginning of the Project: January 2008

In order to demonstrate how far this plant has progressed since I started this project in January, here are the photos from when I first started this project:


The cuttings were planted in their own plastic cup "pot" in the end of February. They survived the move to the house Annah and I are renting and have been growing in their new location since the middle of August.

The First Flower:

The cooler temperatures in last month or two have done wonders for all of the Schlumbergera truncata's (Thanksgiving Cacti) at our house and this is only the first of many blooms at our house. (The pictures below are close-ups of the flower shown at the top of this post)

Schlumbergera truncata
This is the second Schlumbergera truncata post in recent weeks and will surely not be the last. Look forward for more to come in the upcoming weeks! Don't worry though, I will be posting about other houseplants/flowers besides Schlumbergera truncata's!

Rambutan ("Nephelium lappaceum")

Posted by Jordan | Wednesday, November 19, 2008 | , , | 5 comments »

This is a non plant-related post regarding a tropical fruit that I recently found at the grocery store. Annah and I had purchased a freeze-dried variety at a nearby Trader Joe's Store but this was the first time I was able to find the whole fresh fruit for sale at a grocery store.

What is a rambutan? You may be thinking that it looks like something from a Dr. Seuss book, eh? I think it does. Well, according to Wikipedia:

The rambutan (IPA: [ramˈbu.t̪ɑn], Nephelium lappaceum) is a medium-sized tropical tree in the family Sapindaceae, and the fruit of this tree. It is probably native to Southeast Asia, although its precise natural distribution is unknown. It is closely related to several other edible tropical fruits including the Lychee, Longan and Mamoncillo. It is believed to be native to the Malay Archipelago. Rambutan in Indonesian or Malay literally means hairy or hairy fruit caused by the 'hair' that covers this fruit. In Panama, Costa Rica, and Nicaragua, it is known as mamón chino. There is a second species regularly for sale at Malay markets which is known as "wild" rambutan. It is a little smaller than the usual red variety and is colored yellow.
and from Rambutan.com:
The rambutan, Nephelium lappaceum, is a fruit considered exotic to people outside of its native range. To people of Malaysia, Thailand, the Phillippines, Vietnam, Borneo, and other countries of this region, the rambutan is a relatively common fruit the same way an apple is common to many people in cooler climates. This may change for the rambutan over time as availability and distribution improve.
The package, which contained four rambutan, sold for $2.50, so each individual fruit cost 62 cents. This is expensive but I thought it would be worth it since they are only in season for a few weeks or months. This specific variety was grown in Guatemala.

I wonder how fresh these rambutan actually were since they were not nearly as red as freshly picked rambutan, but that is to be expected for fruit that had to be shipped all the way here to Minnesota.

According to Rambutan.com:
The best fruit have little or no black forming on the tips of the soft spines...[but also explains how...] The soft spines, or spinterns, are safe to handle and lose a lot of water after the fruit has been picked. For this reason, to hold them for any length of time in refrigeration requires some sort of plastic film to slow down the moisture loss. The spinterns may turn black within days after harvest but the fruit inside remains quite fresh and tasty for several days or a week longer. If the humidity is high, then the fruit can be held at room temperature in a plastic bag that is not sealed but rather loosely closed.
Perhaps the quality of these rambutan were indeed sufficient to adequately experience the flavor of a raw rambutan.

Regardless, peeling a rambutan is quite simple. Take a knife and lightly cut the outer skin all the way around the entire fruit.

Once you have cut around the entire fruit you can peel the skin open.

Pull the two pieces completely apart and you will see the white fruit inside.

Just by looking closely at this fruit you can tell that it will be juicy. It also happens to be rather sweet and delicious.

Once all of the flesh from the fruit has been removed it will look like this.

Annah and I would try to grow a plant from this seed if were living in a warmer climate as well as an area where the plant would grow. This is what it would look like if we were able to grow our own!


If you are able to find rambutan in your area and you have not tried it before then you should!

Photo Credits: Top picture of rambutan fruit is from Wikipedia, which was denoted as being in the public domain. The Photos of the rambutan being picked from the tree(s) are from the United States Department of Agriculture: Agricultural Research Center.

Schlumbergera truncata 'Dark Marie'

(Schlumbergera truncata 'Dark Marie' flower.)

On Monday of this week the blossom on my Schlumbergera truncata 'Dark Marie' at work finally opened up completely. I was very happy and astonished by the beauty of this flower since I had forgotten how beautiful it was due to this plant only producing one flower last year (which you can read more about that in this post).

I took several pictures while it was in the process of blooming so that I could document the flowering process after the flower buds had come out.

Schlumbergera truncata 'Dark Marie'Schlumbergera truncata 'Dark Marie'Schlumbergera truncata 'Dark Marie'Schlumbergera truncata 'Dark Marie'Schlumbergera truncata 'Dark Marie'
Unfortunately this flower did not last for that long since by today it had already wilted and is starting to wither away (see picture below). Fortunately there are other flower buds on the plant that are also getting ready to bloom and they will soon add another splash of beauty and color to my work office!

Dead Schlumbergera truncata 'Dark Marie'
(Dead Schlumbergera truncata 'Dark Marie' flower.)

Dehydrated Apple Chips

Posted by Jordan | Tuesday, November 11, 2008 | , , , | 5 comments »

During each weekend for the past month or so I have been making dehydrated apple ring chips so that we can enjoy the wonderful fall apples throughout the winter. It is fairly simple to make your own and in this post I will document the method which I have developed.


Firstly, you will need the following items (as shown above):

  • Paring knife
  • Cutting Board
  • Mandoline Slicer
  • 1 Plate
  • Apples
  • Dehydrator

The first step, after washing the apples, is to cut the core out of the apple with a paring knife. I usually try to cut square on both the top and bottom of the apple so that I can just use my thumb to push the core out of the apple and into the garbage. This usually works pretty well as long as I get a clean cut on both the top and bottom of the apple. For this batch of apple chips I used one Honeycrisp apple, which I had purchased at a local Orchard, and then some cheaper and less tasty apples from the grocery store, the specific type I am not sure of. The Honeycrisp apples seem to make the best apple chips since they are full of sweetness and incredible apple flavor.

The next step in the process is to slice the apples into rings. I use an Oxo Good Grips Mandoline Slicer and it works very well. I would recommend buying one if you don't already have one because not only can you use the slicer to make apple chips, but also potato chips and fancy sliced fruits and vegetables for all of your meals! Anyway, as you can see in the picture above, the apples will slice best if they are perfectly round, but the apple I used before taking the picture was not perfect and therefore resulted in some apple rings which were not perfect.

The dehydrator, which I am borrowing from my parents, is an Nesco American Harvest FD-61 Snackmaster Encore Dehydrator and Jerky Maker which has also worked very well. As the name suggests, it's not only for making your own fruit snacks but your own jerky as well. If you buy one of these you'll find yourself making wonderfully tasty and nutritious snacks of your own!

Once you have sliced all of the apples you can place them on the racks of the dehydrator, making sure that none of them are overlapping since this will result in them not drying correctly. Some instructions suggest that you apply lemon juice, ascorbic acid, or other things to prevent discoloration by oxidation, but I haven't used any of those yet and I have not had any problems with the apple chips. Additionally, I enjoy the natural apple flavor and I am unsure I would want any other flavors added to the apple chips.

The dehydrator has seven different settings ranging from 95 degrees Fahrenheit to 155 degrees Fahrenheit. The instruction book that is included with the dehydrator specifies which temperature to use depending on what you are drying. For apples you need to dry them at 145 degrees for about six to eight hours. You can check intermittently to see how the drying process is progressing, but try to leave the lid on so that too much heat is not lost from the unit.

You can tell that the apple chips are ready when you take the chips out and they are crisp and brittle. Sometimes you will need to take the chips out and let them cool before you are able to determine if they are ready or not. See the images below to see how ours looked when they were done.


For storage, I usually just use a quart size ziplock bag and set them on the counter. This allows for easy access when your apple chip craving strikes!


A Few Remaining Outdoor Plants

Posted by Jordan | Monday, November 03, 2008 | , | 1 comments »

(NOID Plant...any ideas?)

During the past few days here in Minnesota we have been having an unseasonably warm stretch of days in the 60's and 70's, which is not what the weather should be around here. Normally at this time of the year its in the 30's and 40's and there is a usually a lingering threat of snow. I'm not going to complain though. The warm weather gave me the chance to go outside during a lunchtime visit to my parent's house. I was surprised to find the white flowers in bloom (see picture above and below) although I was unable to identify them.

(NOID Plant)

I also found my Easter Lilies (Lilium longiflorum), which I had placed out in the yard when I was still living there. I never got around to actually growing them in the garden and I am wondering if I'll be able to bring them inside during the winter. I will have to do some research on that, but luckily they are still alive and green.

Easter Lily
(Easter Lily #1.)

(Easter Lily #2.)

I also found some Sage (Salvia officinalis) and Rosemary (Rosmarinus officinalis) still clinging to life and ready for use in our future cooking adventures.
Easter Lily
(Sage and Rosemary.)

Unfortunately this warm weather will not last so we better enjoy it while it does!